Saturday, March 28, 2015

Tips and Tricks for Installing Drip Irrigation in Your Vegi Garden


In my last post, I talked about some of the things I've learned about using ollas for irrigation in my vegi garden. Now I thought I'd talk about some of the things I've learned about using soaker driplines--specifically, what I've learned about installing it. (FYI, for those who are interested, I've talked before about using soaker hoses, also called weeper hoses, for irrigation. I have also talked before about drip irrigation, but the focus was maintenance.)

Drip irrigation can be a super awesome way to water your garden. It's efficient, because it waters your plants slowly--giving the water time to soak into the soil, causing less evaporating into the air. And it's convenient, because you can put it on a timer, setting it and forgetting it for extended periods of time. And hypothetically, it delivers an even amount of pressure to all the plants on the line, regardless of whether they are on the beginning of the main drip line or the end. Hypothetically.

About that...

This is a picture of some drip irrigation I installed recently:


Each of the four lines you see in the picture is soaker dripline coming off a main drip line. (Basically, soaker dripline is a drip irrigation line with little holes punched in it at regular intervals. You can plant little seeds or plants all along the line to get even water along a whole row.) Off to the right (not pictured) there are two more rows of soaker dripline, making for a grand total of six being watered off the same main line.

Here's the thing: without a little tweaking, the first soaker dripline  (the one on the left, which gets water from the main line first) emits water at a much faster rate than the last. It's not supposed to work that way, but in my experience, it pretty much always does. In fact, the more soaker dripline I add to the main line, the more extreme the problem gets. (Last summer, I got to the point where the last soaker dripline was, for all intensive purposes, not getting any water at all.)

Happily, I went to a drip irrigation store and they thought up an ingenious solution: Stem the flow of water to the lines at the front using 4 gallon emitters, which will ensure that there's some water left for the lines at the back. Genius!

Of course, I forgot I needed to do this when I was installing my soaker driplines recently, but luckily, it's pretty easy to retrofit lines that you have already installed. Here's how:

Retrofitting Your Line

Here's where I'm assuming you're starting: A soaker hose drip line coming off a main drip line. (Beautiful, isn't it?)


Not for long! Step one: Cut the soaker hose drip line a few inches from the main line. 


This next step is optional, but I find it useful. Take a cigarette lighter, and heat up the cut end of the line for a few seconds to loosen up the plastic a bit. (If you do this, don't do it for long. You don't want it too loose. I just do a quick count to five.) Try not to burn your fingers during this step! 


While the plastic is still warm, jam the 4-gallon emitter into soaker driplines. Get it on there nice and snug. (Sorry, I failed to get a picture of this step.) 

Now, go to your irrigation controller and run a quick test to make sure that water comes out of the newly installed emitter. If no water comes out, you may have installed the emitter backwards. I'll be darned if I can tell which way is which on those suckers without just testing them! 

If no water came out when you ran the irrigation controller, cut off the line just below where you added the emitter. Repeat the last few steps, but this time insert the emitter the other way around. Try not to swear. 

Once you successfully get water to come out of the emitter, use the lighter trick to heat up the plastic on the soaker hose drip line that you previously cut off, and jam it onto the newly installed emitter. 


Keep installing 4-gallon emitters on your soaker driplines, starting with the line getting the most water pressure and working your way back, until you've achieved a reasonably even flow of water between all the lines. 


Wednesday, March 25, 2015

How Often Do You Need to Fill Up Your Ollas?

As I use more and more ollas in my garden, I'm learning a lot about them. One of the things that has surprised me is how often I need to fill them. When I originally looked at the Dripping Springs Ollas FAQ site (which I totally recommend), they mentioned that they fill their ollas 1-2 times a week in Texas. I figured I'd get about the same results here in Arizona. And I do... sometimes, under certain circumstances. Under other circumstances... not so much. So what circumstances effect how often I have to fill up the ollas?

Weather

This is no surprise, right? In the summer, the plants get a lot thirstier, so I have to water the ollas a lot more often than in the winter. Honestly, I can't remember how much I watered them last summer, but I can tell you it was more than this winter, when I sometimes went as many as 5-6 days between top-ups for some of the ollas. 

Plant Size

I prefer to keep the ollas around young plants more topped up than mature plants because the young plants' roots are shallower. If the ollas aren't relatively full, the plants might not be able to reach the moist soil because their roots are too shallow. On the other hand, mature plants have had a chance to develop deep roots that can reach the moist soil near the bottom of an almost empty olla.


They're so cute when they're young, but they need so much extra work!

Lately, I've been filling them up every other day or so, but I've come up with a couple of ideas for how I might be able to scale that back just a tad. (See the next entry.)

Exposed Soil?

One of the things that has really surprised me is that the ollas around big, established plants consistently drain a lot slower in my garden than the ones around small plants. For instance, that little zucchini plant in the picture above (which is about 10 inches in diameter) drains much, much faster than these monsters: 


No thank you. I couldn't possibly have any more. I'm full. 

That is a snap dragon plant and parsley plant. The parsley is over two feet in diameter! Both are very dainty drinkers. I'm filling up their olla about twice a week right now. I could probably get away with less. (Remember, I'm filling up the teeny, tiny zucchini plant's olla every other day, and I suspect I'm pushing it.)  

I'm assuming this phenomenon is caused by the big plants shading the soil around the ollas. Look at all that bare soil around the zucchini plant. I'm guessing that water is evaporating like crazy in into the air around it. There's barely any bare soil around the parsley plant, so there's probably very little evaporation happening there. 

Assuming I'm right, I'm thinking the right thing to do is to create some temporary shade for the soil around small plants until they have a chance to grow around the ollas and create some permanent shade. Perhaps I'll pile up some hay around the plants and ollas (leaving some room for any seeds I've got planted nearby) or erect some sort of shade structure. We'll see.

Update 4/15/15: So I tried adding hay around the ollas with lots of exposed soil and adding a little bit of shade--no joy. I still had to keep adding about the same amount of water to them. Then I had an "aha!" moment. The issue probably isn't exposed soil or shade. The reason established plants probably need so much less water is that their roots have had time to grow right up next to the ollas. For instance, check out this picture of an "inverted root ball" I found on the Internet: 


All that light brown stuff is a big mass of roots that grew right up against the olla. Once the olla was pulled out, the roots were formed in a perfect olla shape in the soil. 

So the reason young plants need more water than established plants is that they haven't attached themselves directly to the olla yet, which means more water is needed to pass through the soil to the roots. Once the roots get more established, they'll be pressed up right against the olla, and no extra water will be required to pass through the soil. So the extra water requirements for young plants is a purely a temporary situation. 

Soil Type?

I suspect results will also vary depending on your soil type, but since I only use one type of soil around my ollas, I really can't speak to that. (All my ollas are planted in native soil--i.e., clay and rocks--amended with manure and compost. Maybe they would need more fill ups with looser soil that drains better? I'm just theorizing here.)

So there you go. Those are the factors that I have found that may impact how often you have to fill up your ollas. In other words "mileage may vary depending on use." I'm still a huge fan and think they are a great way to save water. I'm just always looking for a way to make them more efficient! 

Thursday, March 19, 2015

Keyhole Gardens: My New Obsession

Before we talk about my latest obsession, I need to make a confession: I hate composting. I still do it, because I would be consumed with overwhelming guilt if I didn't, but I hate it. It's messy and stinky and it attracts bugs. Ew. I just hate the bugs. And it's not like I haven't tried lots of things to try to make it better. Here's my sad (and whiny) tale:

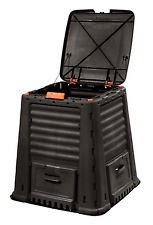
I started with a free composter offered by the city of Gilbert. It looked something like this.


Total disaster. I couldn't properly stake it into the ground, because the soil where I was trying to place it was the consistency of concrete and the stakes it came with were approximately the size of thumbtacks. My husband and I are both pretty wary of rodents coming into the yard, so having what essentially was an open-bottomed food receptacle was a no-go in our minds. I sent it back.

Next up: I got a couple of those turny deals that are completely enclosed and make it easy to aerate your compost. Specifically, I got the Keter 17186745 Dynamic Composter (60 gal). Here's a lovely picture of a mother and daughter using one in their idyllic country yard:


I wonder what that mother has to do to get that daughter to compost? Bribery? Threats of grounding? I just don't have to the parental backbone to deal with the whining that would ensue. Yeah, sometimes my daughter likes to turn the crank on our composter, but be close to it when the door is open? No thanks! And by the way, we have big bungy chords wrapped around ours because the doors have a tendency to pop open when the composter is full and the contents dump out everywhere. Sooooooooooo lame.

And when we finally have finished compost? It's easy enough to dump it on the ground underneath the composter, but getting it into the garden is a bit of a logistical nightmare. I either have to scoop it out of that thing into another container and haul it over to the garden (no fun) or drag the whole composter over to the garden and empty it there (awkward). Either way, I'm reaching pretty deep into the thing to clean it out, because a decent amount of compost doesn't want to come out on its own. (Gross)

So to deal with the not-easy-to-empty-out problem, the next thing I tried was garbage cans. I just took some heavy duty trash cans with lids that stay on well and drilled lots of holes in them. When it comes time to turn the trash cans, I put them on their sides, and push them around with my feet. Not bad. They are easy enough to turn, protect the compost from critters, and are easy to dump into the garden when the time comes. Sounds like the perfect solution, right?

No! I still want something better! I'm a big whiny baby who still wants to have something easier! Wah! Wah! Wah!

Enter my new obsession: Keyhole gardens. There are a couple of variations on keyhole gardens, but the one I'm talking about has a compost pile right in the middle. The basic idea is that you create a circular garden with a notch on one side and a hole in the middle (i.e., something that looks like an old-fashioned keyhole from above) and you put a compost pile smack dab in the middle. Like this:


Here's another view:


Once you set this up, all you have to do is periodically water the compost, creating compost tea that seeps into the surrounding garden, nourishing the plants. Which means you never have to turn the compost and you never have to move the compost. You just throw your "greens" (kitchen scraps in my case) and "browns" (shredded newspaper in my case) in there periodically and water the compost tower periodically. Are you hearing me people? Composting just got lazier! Woo hoo!

As best as I can tell, this gardening method was pioneered by the Send a Cow organization to help families in Africa with poor soil and limited water. (Yup, in addition to helping lazy gardeners like me, it actually has a much more altruistic purpose.) Apparently, keyhole gardens are catching on big in arid climates in particular, because they save water in addition to using compost efficiently. Specifically, keyhole gardens appear to be catching on big in Texas with the help of Dr. Deb Tolman and Texas Co-op Power. (I have to admit, I still don't fully understand how they save water--they are raised beds, which traditionally suck up more water--but results don't lie!)

So in addition to making composting easier, keyhole gardens also save water? Sold! I can't set one up yet, since I've already planted my spring/summer garden, but I can start planning for next season. In the meantime, I'll pour over pictures of other people's keyholes gardens and come up with my perfect plan. The thought of makes me almost as happy as this little cutie appears to be with his new garden: